sound_classification_ml_production
Machine Learning in Production: Sound Classification
In this repository you will find a hands-on tutorial of an end to end example of machine learning in production.
The objective will be to create a machine learning application able to classify different audio sounds and deploy it in the cloud. We will use the well-known UrbanSound8k Dataset, which contains the following 10 sounds: Air conditioner, car horn, children playing, dog bark, drilling, engine idling, gun shot, jackhammer, siren, street music.
During this tutorial we will perform data exploration and analysis, followed by the training and evaluation of a machine learning model, and finally we will deploy our app on the Cloud using Amazon Elastic Beanstalk and Docker for free.
The repository contains:
- A Colab notebook to perform Data Exploration and Analysis
- A Colab notebook to perform Training and Evaluation of a Machine Learning Model
- Instructions to create your own Flask app
- Instructions to create a Docker image and upload it to AWS Beanstalk to share your app with the world
Data Exploration
Observe the dataset statistics and visualize the data:
![]()
| Audio Files Waveform | Audio Files Mel-Spectogram |
|---|---|
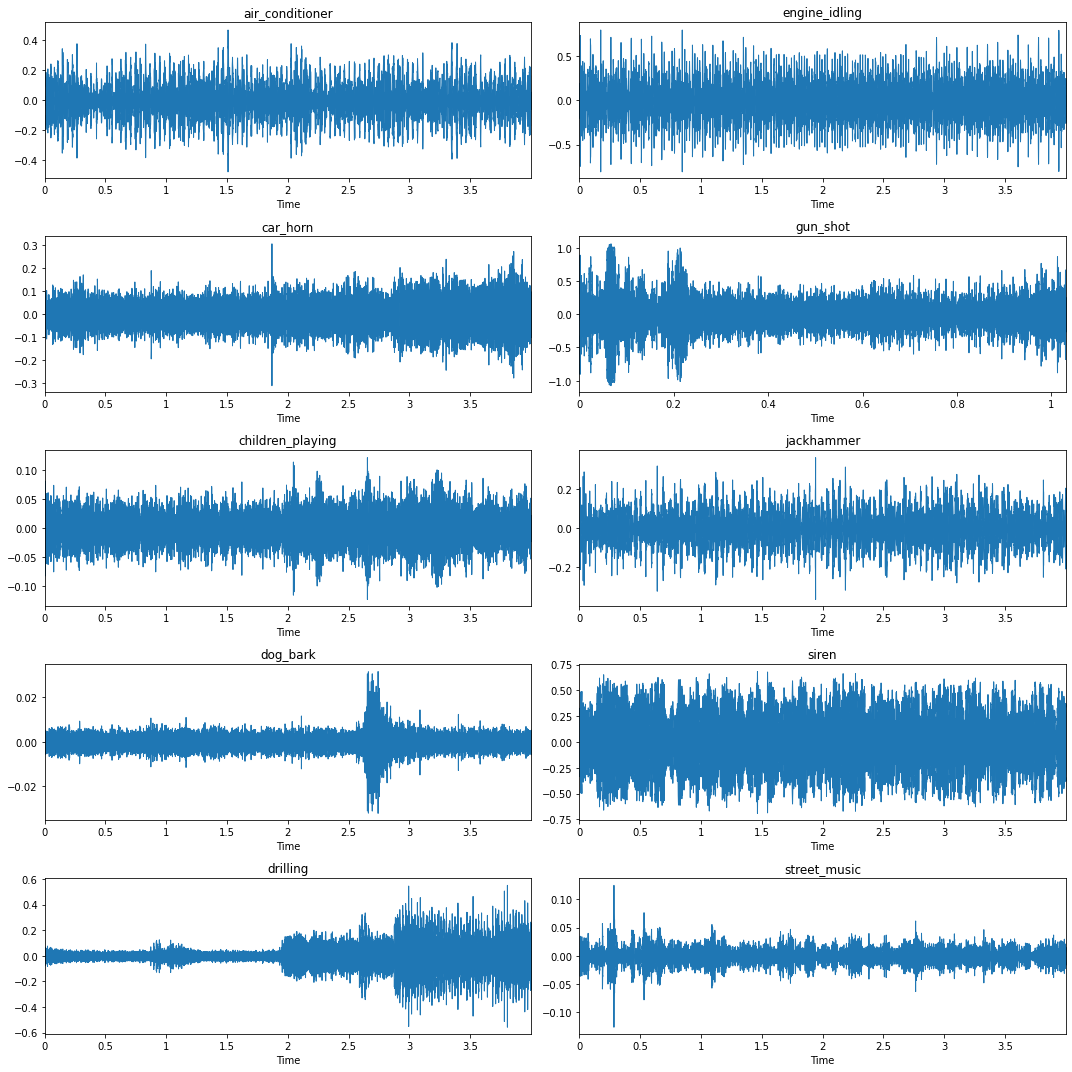 |
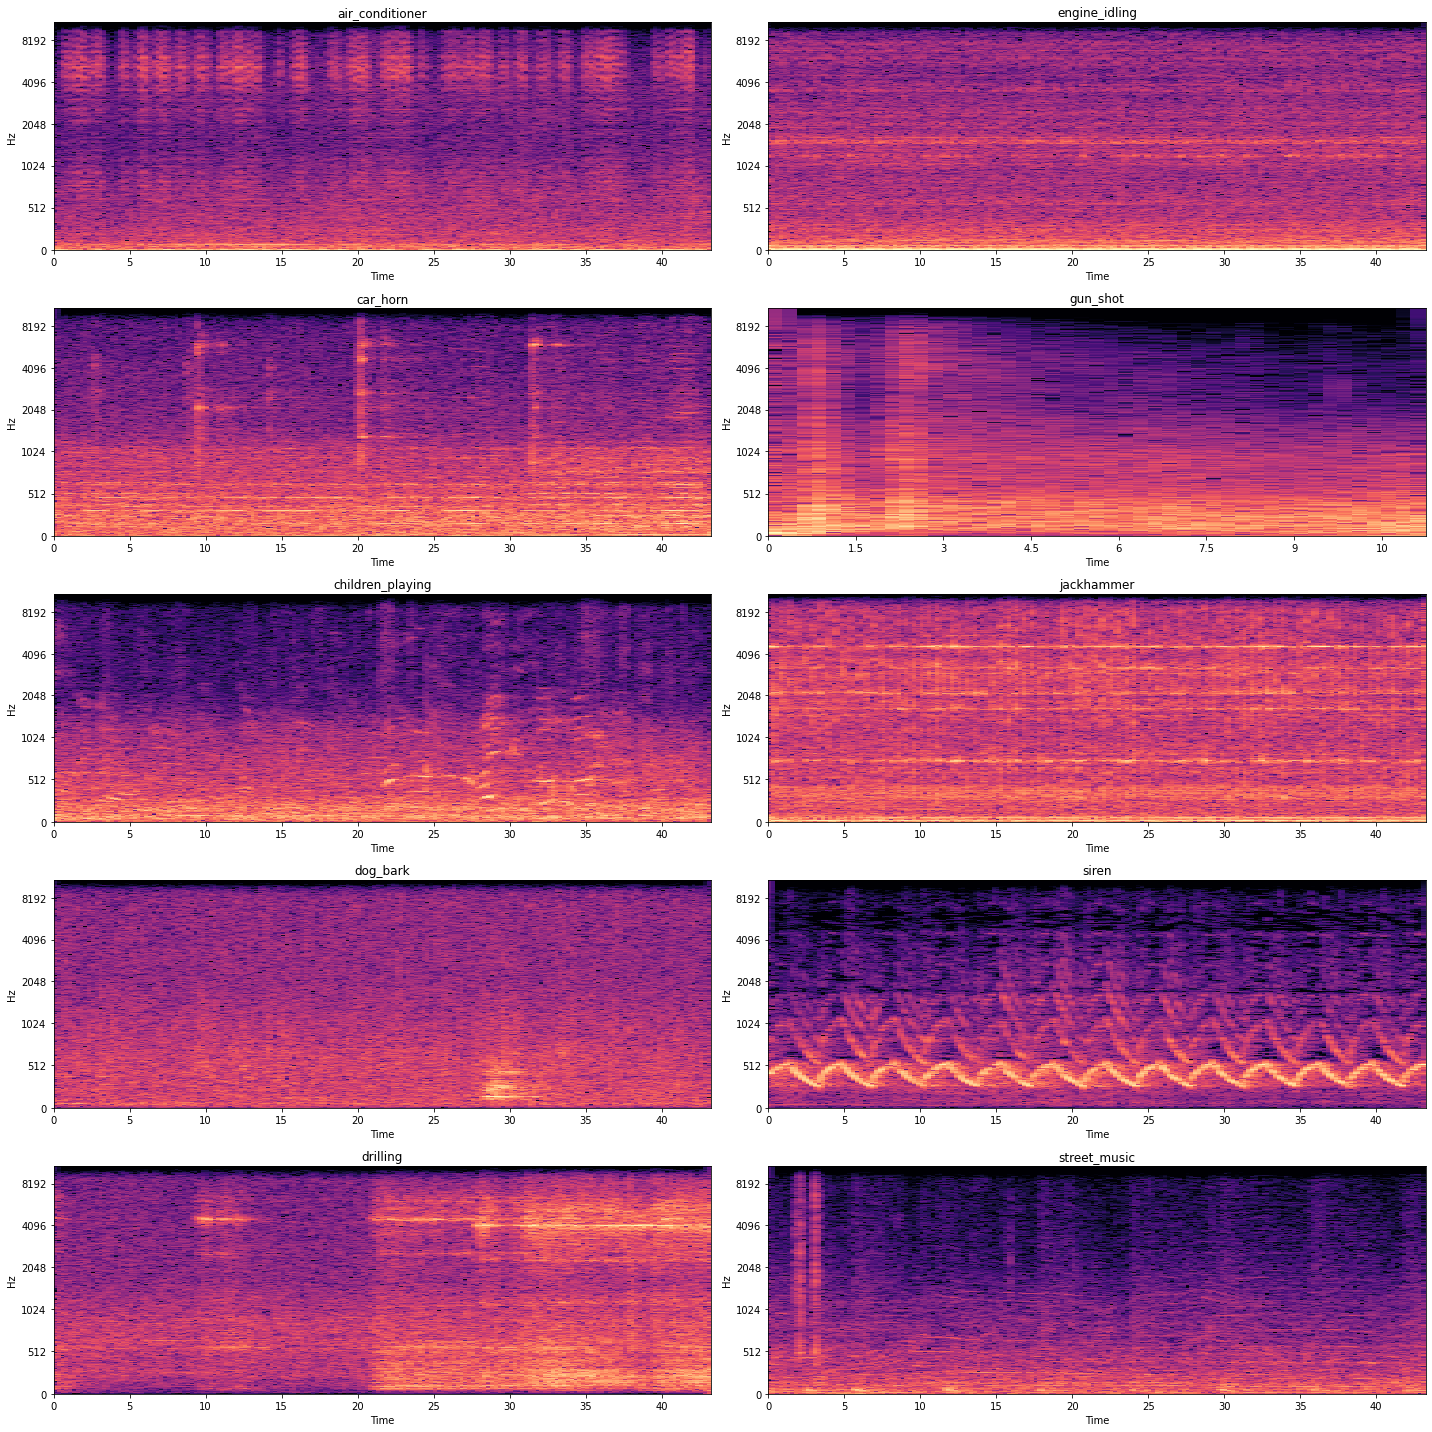 |
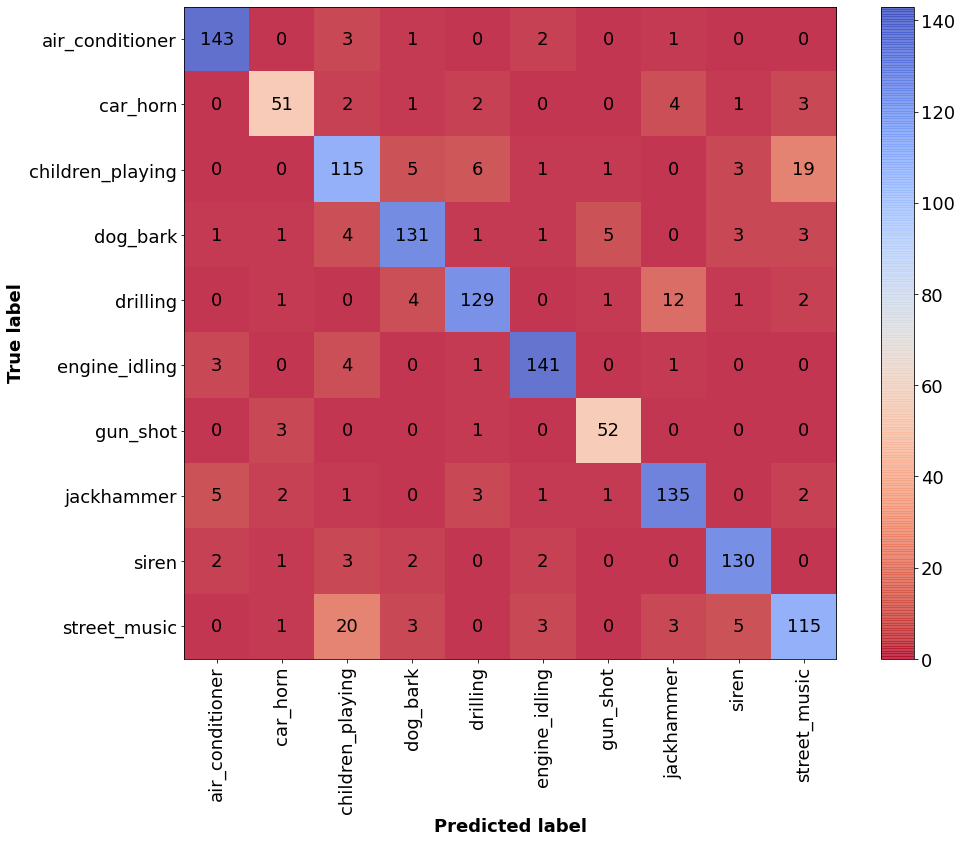
Machine Learning
Train a Convolutional Neural Network using Keras and Tensorflow to classify audio samples:
![]()
Creating the Flask App
We will use Flask to build our app.
Flask is a lightweight WSGI web application framework. It is designed to make getting started quick and easy, with the ability to scale up to complex applications. It began as a simple wrapper around Werkzeug and Jinja and has become one of the most popular Python web application frameworks.
I will provide the app.py file containing all the code needed to run it. You will need a Python installation (I was using on 3.8+) and pip to be able to run the following code.
- Clone this repository:
git clone git@github.com:jsalbert/sound_classification_ml_production.git
- Create a virtual environment using virtualenv and install library requirements:
pip install virtualenv
virtualenv .venv
source .venv/bin/activate
pip install -r requirements.txt
- Go to the folder
flask_appand run the app locally in your computer:
python app.py
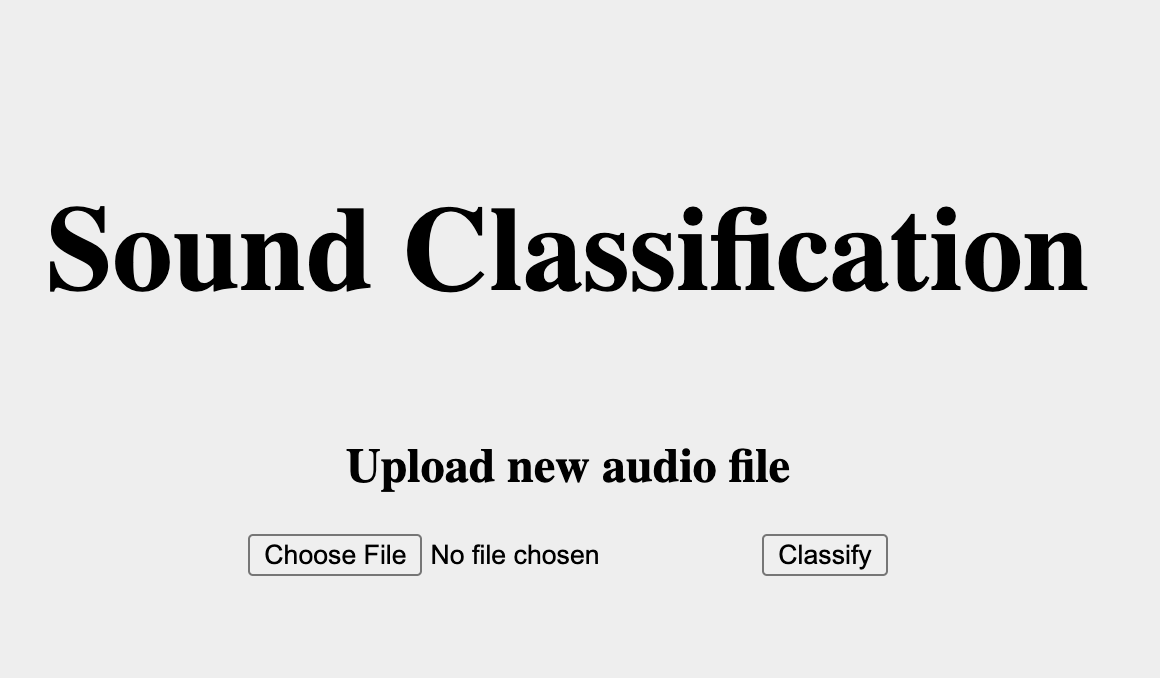
- Access it via localhost:5000
You should be able to see this screen, upload and classify a sound:
Creating a Docker Image and Uploading to AWS Elastic Beanstalk
For this part of the tutorial you will need to install Docker and create an account in Amazon Web Services (AWS) and Docker Hub. I recommend reading and going through Docker-Curriculum for a more extense introduction and a Docker tutorial.
From Docker-Curriculum:
Docker is a tool that allows developers, sys-admins etc. to easily deploy their applications in a sandbox (called containers) to run on the host operating system i.e. Linux. The key benefit of Docker is that it allows users to package an application with all of its dependencies into a standardized unit for software development. Unlike virtual machines, containers do not have high overhead and hence enable more efficient usage of the underlying system and resources.
Containers offer a logical packaging mechanism in which applications can be abstracted from the environment in which they actually run. This decoupling allows container-based applications to be deployed easily and consistently, regardless of whether the target environment is a private data center, the public cloud, or even a developer’s personal laptop.
We will use Docker to create a container for our app. I will provide the necessary Dockerfile and Dockerrun.aws.json files to be able to run your app locally and deploy it in AWS.
First you should verify Docker is properly installed, you can run:
docker run hello-world
and you should see:
Hello from Docker.
This message shows that your installation appears to be working correctly.
After that, we will build our own Docker image via a Dockerfile.
A Dockerfile is a text document that contains all the commands a user could call on the command line to assemble an image. Using docker build users can create an automated build that executes several command-line instructions in succession.
You should be on the same directory where the dockerfile is located and run:
docker build -t yourusername/sound_classification .
Now you should be able to see your image in the list when you run:
docker images
And you should be able to run the app locally:
docker run -p 8888:5000 yourusername/sound_classification
To deploy our image we will publish it on a registry which can be accessed by AWS, in our case Docker Hub. If this is the first time you are pushing an image, the client will ask you to login. Provide the same credentials that you used for logging into Docker Hub.
docker login
After that you can push your image to the registry by running:
docker push yourusername/sound_classification
Once that is done, you should be able to view your image on Docker Hub. And now that your image is online, anyone who has docker installed can access and use your app by typing just a single command!
docker run -p 8888:5000 yourusername/sound_classification
Now we will see how to carry out the deployment on AWS Elastic Beanstalk.
AWS Elastic Beanstalk is an easy-to-use service for deploying and scaling web applications and services developed with Java, .NET, PHP, Node.js, Python, Ruby, Go, and Docker on familiar servers such as Apache, Nginx, Passenger, and IIS. You can simply upload your code and Elastic Beanstalk automatically handles the deployment, from capacity provisioning, load balancing, auto-scaling to application health monitoring. At the same time, you retain full control over the AWS resources powering your application and can access the underlying resources at any time.
You will need to modify the Dockerrun.aws.json file to rename the username with yours. If you leave mine it should work as I am hosting a public image.
Follow the next steps:
- Login to your AWS console.
- Search Elastic Beanstalk on the search bar or the menu and click.
- Select Create New Environment.
- Introduce a name for your application on application name.
- Choose Docker as a platform. Select Upload your code and upload the
Dockerrun.aws.jsonfile after making your changes.
The environment creation will take some minutes and after that you should be able to access the website where your app is hosted.
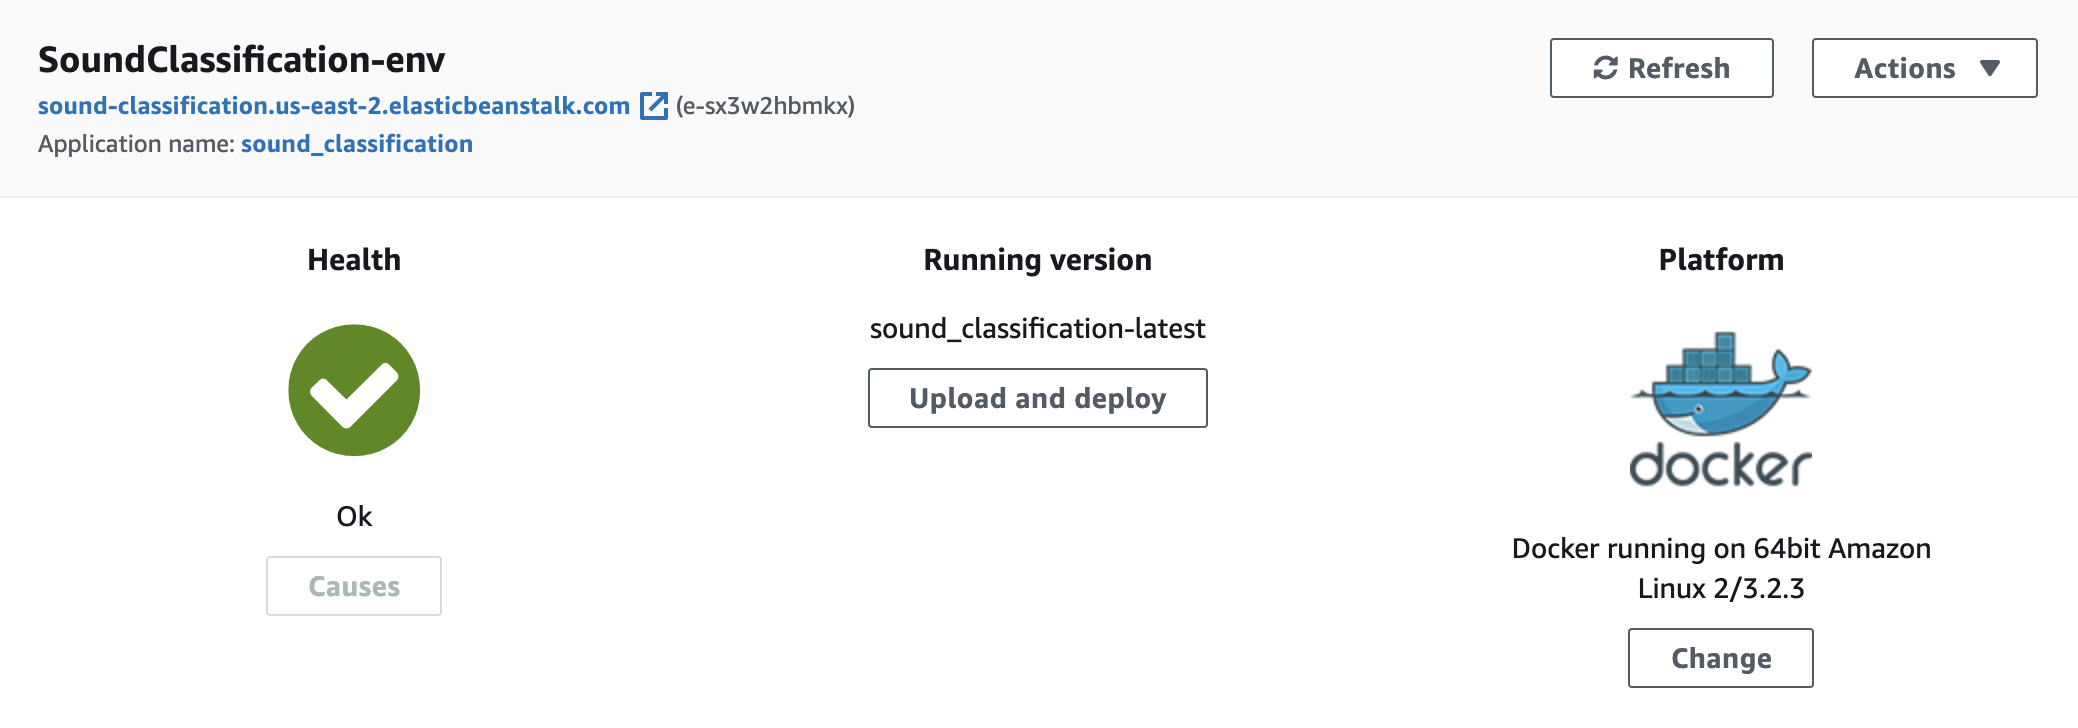
Click on the link shown and it should be ready to go. You can play with your own audios or the example ones.
CONGRATULATIONS!
You reached the end of the tutorial.
Hope you enjoyed it and hopefully learnt something 🤓 .
And… Don’t forget to shut down the environment to not get charged for extra use of resources 🤑 !!!
I would appreciate any feedback, comment, typo or error correction, please let me know in the Issues section.
References
- Urban Sound 8k Dataset – https://urbansounddataset.weebly.com/urbansound8k.html#10foldCV
- Docker – https://www.docker.com/
- Flask – https://flask.palletsprojects.com/en/1.1.x/
- Docker Curriculum – https://docker-curriculum.com/